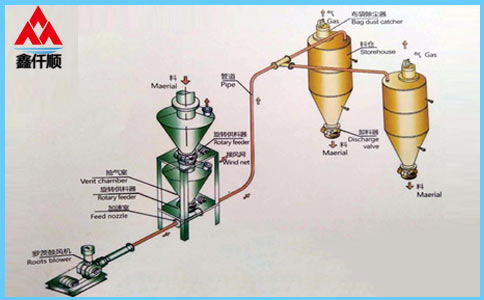
Solution to oil leakage of Roots blower and replacement of oil seal of Roots blower
Source: Roots blower manufacturer
Published on: February 12, 2022
Hits:

Related information
-
How to repair the surface defects of Roots blower impeller? -
How to remove the bearing of Roots blower? -
What principles should be followed in the maintenance of three leaf roots blower? -
How to handle the wrong lubricating oil for Roots blower? -
Performance characteristics and maintenance of Roots blower for aquaculture -
How to select appropriate Roots blower aerator for aeration in aquaculture? -
What principles should be followed in the maintenance of three leaf roots blower? -
Notes on installation of safety valve of three blade roots blower -
Introduction to the Main Causes of Abrasion of Three blade Roots Blower Impeller -
What causes Roots blower tripping?

Xinqianshun's latest products


Random articles
-
Whether the outlet pressure of roots blower can be adjusted, and what is the pressure range of roots blower -
How to select industrial stainless steel Roots blower? -
What are the differences between rotary fan and Roots fan? -
Price of Roots Blower | How much is the price of a Roots Blower? -
How to solve the noise problem of Roots blower? With ten years of experience in Roots blower manufacturers, we can easily help you deal with noise pollution! -
What are the selection methods of Roots blower? -
How to maintain Roots blower? -
What are the ventilation requirements when using Roots blower? -
What are the main features and uses of the three leaf Roots blower? -
Advantages and disadvantages of Roots blower
Latest news articles
-
How to repair the surface defects of Roots blower impeller? -
How to remove the bearing of Roots blower? -
What principles should be followed in the maintenance of three leaf roots blower? -
How to handle the wrong lubricating oil for Roots blower? -
Performance characteristics and maintenance of Roots blower for aquaculture -
How to select appropriate Roots blower aerator for aeration in aquaculture? -
What principles should be followed in the maintenance of three leaf roots blower? -
Notes on installation of safety valve of three blade roots blower -
What are the causes of tripping of Roots blower frequency converter? -
Introduction to the Main Causes of Abrasion of Three blade Roots Blower Impeller